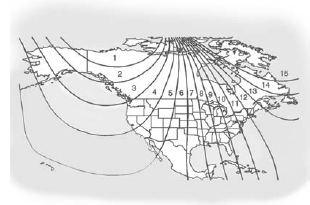
Compass Variance (Zone) Procedure
1. Do not set the compass zone when the vehicle is moving. Only set it when the vehicle is in P (Park).
Press the vehicle information button until PRESS  TO CHANGE COMPASS ZONE displays. Or, if the vehicle does not have DIC buttons, press the trip odometer reset stem until CHANGE COMPASS ZONE displays.

2. Find the vehicle's current location and variance zone number on the map.
Zones 1 through 15 are available.
3. Press the set/reset button to scroll through and select the appropriate variance zone.
4. Press the trip/fuel button until the vehicle heading, for example, N for North, is displayed in the DIC. Or, if the vehicle does not have DIC buttons, press and hold the trip odometer reset stem for two seconds to select the next available variance zone. Repeat this step until the appropriate variance zone is displayed.
5. If calibration is necessary, calibrate the compass. See “Compass Calibration Procedure” following.
See also:
Lower Anchors
Lower anchors (A) are metal bars built into the vehicle. There are two lower anchors for each LATCH seating position that will accommodate a child restraint with lower attachments (B). ...
Erasing Universal Remote Buttons
All programmed buttons should be erased when the vehicle is sold or the lease ends.
To erase all programmed buttons on the Universal Remote device:
1. Press and hold down the two outside buttons u ...
Ignition Transmission Lock Check
While parked, and with the parking brake set, try to turn the ignition to LOCK/OFF in each shift lever position.
• The ignition should turn to LOCK/OFF only when the shift lever is in P (Park).
†...


