


Cold Check Procedure
Use this procedure only as a reference to determine if the transmission has enough fluid to be operated safely until a hot check procedure can be made. The hot check procedure is the most accurate method to check the fluid level. Perform the hot check procedure at the first opportunity.
Use this cold check procedure to check fluid level when the transmission temperature is between 27°C and 32°C (80°F and 90°F).

1. Locate the transmission dipstick at the rear of the engine compartment, on the passenger side of the vehicle.
See Engine Compartment Overview on page 10‑6 for more information.
2. Flip the handle up, then pull out the dipstick and wipe it with a clean rag or paper towel.
3. Install the dipstick by pushing it back in all the way; wait three seconds, and then pull it back out again.
4. Check both sides of the dipstick and read the lower level. Repeat the check procedure to verify the reading.
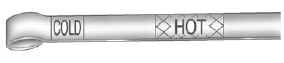
5. If the fluid level is below the COLD check band, add only enough fluid as necessary to bring the level into the COLD band. It does not take much fluid, generally less than 0.5 Liter (1 Pint). Do not overfill.
6. Perform a hot check at the first opportunity after the transmission reaches a normal operating temperature between 71°C to 93°C (160°F to 200°F).
7. If the fluid level is in the acceptable range, push the dipstick back in all the way, then flip the handle down to lock the dipstick in place.
See also:
Overheated Engine Protection Operating Mode
This emergency operating mode lets the vehicle be driven to a safe place in an emergency situation. If an overheated engine condition exists, an overheat protection mode which alternates firing groups ...
Using this Manual
To quickly locate information about the vehicle, use the Index in the back of the manual. It is an alphabetical list of what is in the manual and the page number where it can be found. ...
Tire Terminology and Definitions
Air Pressure: The amount of air inside the tire pressing outward on each square inch of the tire. Air pressure is expressed in kPa (kilopascal) or psi (pounds per square inch).
Accessory Weight: The ...