


Hot Check Procedure
Use this procedure to check the transmission fluid level when the transmission fluid temperature is between 71°C and 93°C (160°F and 200°F).
The hot check is the most accurate method to check the fluid level. The hot check should be performed at the first opportunity in order to verify the cold check. The fluid level rises as fluid temperature increases, so it is important to ensure the transmission temperature is within range.

1. Locate the transmission dipstick at the rear of the engine compartment, on the passenger side of the vehicle.
See Engine Compartment Overview on page 10‑6 for more information.
2. Flip the handle up, then pull out the dipstick and wipe it with a clean rag or paper towel.
3. Install the dipstick by pushing it back in all the way; wait three seconds, and then pull it back out again.
4. Check both sides of the dipstick and read the lower level. Repeat the check procedure to verify the reading.
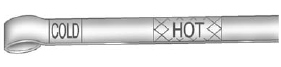
5. Safe operating level is within the HOT cross hatch band on the dipstick. If the fluid level is not within the HOT band, and the transmission temperature is between 71°C and 93°C (160°F and 200°F), add or drain fluid as necessary to bring the level into the HOT band. If the fluid level is low, add only enough fluid to bring the level into the HOT band. It does not take much fluid, generally less than 0.5 L (1 pint). Do not overfill.
6. If the fluid level is in the acceptable range, push the dipstick back in all the way, then flip the handle down to lock the dipstick in place.
See also:
Following Distance
Stay at least twice as far behind the vehicle ahead as you would when driving the vehicle without a trailer.
This can help to avoid situations that require heavy braking and sudden turns. ...
Wheel Replacement
Replace any wheel that is bent, cracked, or badly rusted or corroded. If wheel nuts keep coming loose, the wheel, wheel bolts and wheel nuts should be replaced.
If the wheel leaks air, replace it.
S ...
Backing Up
Hold the bottom of the steering wheel with one hand. To move the trailer to the
left, move that hand to the left. To move the trailer to the right, move your hand
to the right. Always back up slow ...