Removing the Spare Tire and Tools
To access the spare tire and tools:
1. Open the liftgate. See Liftgate on page 2‑9.
2. Lift the load floor up.

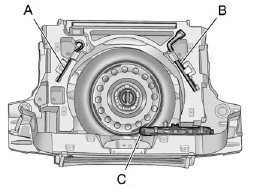
Coin/Pierce Jack with One-Piece Wrench
A. Extension
B. Wheel Wrench
C. Jack

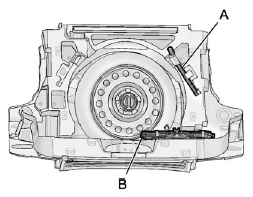
Hex-Head Jack with Three-Piece Wrench
A. Wheel Wrench
B. Jack
3. If you have a coin/pierce jack and one-piece wrench, remove the extension (A), wheel wrench (B) and jack (C).
If you have a hex-head jack and three-piece wrench, remove the wheel wrench (A) and jack (B).
Place the tools next to the tire being changed.

4. Turn the retainer nut counterclockwise and remove the spare tire.
5. Place the spare tire next to the tire being changed.
See also:
Using Voice Commands During a Planned Route
Cancel Route
1. Push X. System responds: “OnStar ready,” then a tone. Say “Cancel route.”
System responds: “Would you like to cancel route directions to your destination?”
2. Say “Ye ...
Transferring Audio from the Bluetooth System to a Cell Phone
During a call with the audio in the vehicle:
1. Press .
2. Say “Transfer Call.” ...
Entering the Feature Settings Menu
1. Turn the ignition on and place the vehicle in P (Park).
To avoid excessive drain on the battery, it is recommended that the headlamps are turned off.
2. Press the customization button to enter th ...


